Hyundai IONIQ Forum banner

[DIY] Installing an Amplifier into USA Spec Ioniq Hybrid

55K views 75 replies 18 participants last post by  Childs Play  
#1 · (Edited by Moderator)
I’ve put together a guide for wiring an amplifier into a USA Spec Hyundai Ioniq Hybrid without the premium Infinity sound system.

I’ve seen a few people asking how to do this since there’s no traditional 12V lead-acid battery in these cars so I put together a guide for whoever may need it.

Disclaimer: I am not responsible for your vehicle or you if you mess something up. This guide is to help people who have a moderate understanding of vehicle electrical/stereo systems and need a little extra help in figuring out this rather complicated vehicle.

Also, please be aware that you are working with electrical components. Do not move forward with this guide unless you have a moderate understanding of how to install car stereo equipment, or do not feel comfortable doing this. While a shock from a 12V system can be a bit painful and scare you, a shock from the 240V system can and will kill you. If you’re following this guide you won’t be messing with any wiring that has to do with the 240V system. But if you don’t know what you’re doing and disconnect or dig into something you shouldn’t, you might.


Things Needed:

Amplifier (I’m using the Rockford Fosgate PBR300X1 for this guide.)

Amp install kit (Depending on amp and subs this can vary. I used the Rockford Fosgate RFK10 kit for this install.)

Speaker Wire (I purchased 16 Gauge, but it may be easier if you use something smaller to get through the door, however 16 Gauge is what is recommended for the amp speaker connections on the amp I’m installing.)

Rockford Fosgate RFI2SW Speaker Line to Male RCA Adapter (If installing as High Level input to same amp used in this guide.)

Remote Punch EQ (PEQ) – Optional

Socket wrench

10mm socket

12mm socket

Philips head screw driver

Coat hanger

Flash light

Wire stripper/cutter

Quick connects or soldering iron

Needle nose pliers


Power Wire Install

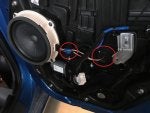
First thing you’ll want to do is pop the hood. You’ll then want to unbolt the box in the below picture with the 10mm socket. It has three connection points, one up top and two at the bottom. You may need some extensions to get to the two bottom ones. Also, go ahead and remove the mat and tire inflation kit from your trunk area so you have more room to work with once you get to that step.

Image


Once you have it unbolted you can lift it up a bit and pull it towards the front and center of the car. You’ll need to do this unless you have small hands and can get behind this with no issues, or if you can get a hold of the coat hanger without doing this step.

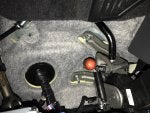
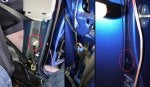
Back inside the car under the dash near the emergency break there is a rubber grommet which you’ll need to push/pull through to have an access point through the firewall. I had a screwdriver going through the firewall in the photo so I could identify where it came out on the engine bay side.

Image


*It’s worth noting here that this worked with a 10 gauge wire. I’m using a PBR300X1 amp from Rockford Fosgate as it is a highly efficient amp designed to be used on Motorcycles and ATVs. Given that this electrical system is supposedly pretty limited due to not having a traditional 12V battery, I went this route. You may be able to get away with a slightly larger wire with a different amp. I did not test this however.*

You’ll want to then push a coat hanger through the firewall hole where you moved the grommet from the interior to the engine bay.

Once you have that, you can tape the power wire to it to pull it from the engine bay through the firewall to the interior. While it will involve pulling almost all of the wire through, you need to do it this way if you have an inline fuse already pre-installed into the wire as you will not be able to push the fuse part of the wire through the driver’s area to the engine compartment.

Image


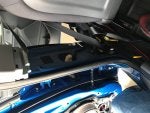
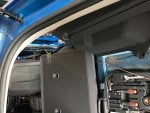
Once you’ve pulled it through the firewall you’ll want to carefully thread all of the wire through (like above) up till you have just enough under the hood to route it and connect it to a connection under the fuse box. Do not hook the power wire up just yet. You can go ahead and bolt the box back on you unbolted earlier.

Image


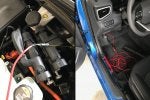
You’ll then want to route the wire under the trim (as demonstrated in the above right photo) to the back of the car starting by pulling all of the wire back behind the emergency break and hood release working your way to the back seats. The middle trim on the front door is removable by lifting straight up on the ends and then middle. However, it isn’t 100% necessary to remove the trim to route the wire.

Then you’ll want to run it under the trim up to and under the seat as shown below. You may need two people to push the wire under the seat to the hatch/trunk area as shown. I had a friend help me do this but you can do it yourself if necessary. It will just take some extra time.

Image


You’ve now successfully routed the power wire.

*If you’re ready to wire the power wire to the car you can follow the below step, if not, skip to the ground wire section and come back to this later.*

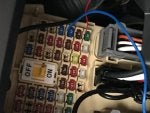
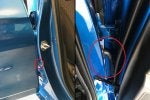
Make sure to remove the in-line fuse before doing this step. To hook the power wire to the car’s electrical system you’ll need to unbolt the connection with a 10mm socket, install the wire, and reinstall the nut as shown. You can then run the power wire down the side of the box along the side of the other wire running down the side of the box, and reinstall the cover.

Image
 

Attachments

  • Like
Reactions: dryland
#2 ·
Ground Wire Install

Now you will want to install the ground wire. I just undid the bolt shown below for back seat with a 12mm socket, put the wire with its connector around the bolt, and bolted it back down. There are other places you could install the ground, but this was the easiest place I found.

Image
 

Attachments

#3 ·
REM Wire Install

Run the remote turn on wire the same way you ran the power wire, however start from the back of the car and work your way forward. Then come back up through the fuse box section under the driver’s side dash. I installed the REM wire into the fuse shown (It's labled "Washer" on the fuse guide; Blue wire in picture.) as it turns on the amp when the car starts and turns off the amp when you turn the car off. This will keep your amp from running the battery down when the car is not in use. There are other fuse connections that turn on and off with the car as well. Just watch which one you hook it up to as some of the fuse connections are on constantly whether the car is on or off. If you hook it to one of these it will leave the amp on and drain your battery.

Image
 

Attachments

#4 ·
Speaker Wire Install

First, you’ll want to remove the door panels. There’s a video on YouTube for how to do this. Just search for “how to remove door trim Hyundai Ioniq” and a video by Paul Romo (not me) should show up. The easiest way to do this is to first, remove the screw under the rubber piece sitting down in the arm rest. You will then start at the bottom of the door (there’s a gap to make it easier for removal there) and pop the door trim out working your way left and right. Once you have all the clips undone, you can lift upward.

You’ll need to remove two connections at this point to fully remove the door. The electrical connection for the window and the connection for the door handle itself. The electrical connection has one clip. Push that in and pull it out. The door connection also has one clip. You’ll lift that clip and then tilt it up/away from the door and it will unhook. This is all explained in detail with the video mentioned above.

Then, remove the four bolts holding the speaker in place as you’ll need to access behind it to run the wire from the door to inside the car.

Image


Next, you’ll need to remove the inner B-pillar trim of the car. If you have reinstalled the front seat bottom door trim, or did not remove it while running the power wire at the bottom of the driver’s side door, go ahead and remove it.

Then you’ll want to pull the weather stripping out a bit till you have cleared the dark lower trim on the B-Pillar. This may not be necessary, however I found it easier to remove the inner trim this way.

After that, you’ll want to pull the seat all the way forward as well as tilt the back support all the way forward.
Starting from the bottom to remove the B-pillar trim, pull directly away from the trim to remove it. To make this easier, you can push the seat belt connection at the bottom, flat. You can look under to see where some of the clips are so you don’t damage the trim by bending it. Once you’re near the top, the trim is clipped into the top lighter section on the sides. You can reach under and pull up on each side. It will un-clip. Then there’s one more clip that you’ll need to pull out, away from the pillar to release the trim. See the below picture for what the area looks like with the trim removed.

Image


Once you have the trim removed, I’d recommend moving the seat belt out of the way as shown above. I just pulled it out all the way and then wrapped it around the seat and under the headrest. This will give you room once you get to pulling the wire through.

Next, you’ll want to remove the bottom rubber grommet shown in the picture below at the bottom of the exterior B-Pillar as well as pull back/undo the rubber boot from the door and car pillar. With this grommet removed and the inside trim of the B-pillar removed, you’ll be able to see through the small hole through the car. This is where you’ll eventually pull the speaker wire through.

Image


**Note: If you plan on hooking up to your amp with a high level speaker input connection, you’ll only need to run a positive wire from the positive connection on your speaker to the rear area to connect to the amp. If you want to install a high to low converter you’ll need both the positive and negative speaker wires ran from the speaker to the amp.**

You’ll want to run the wire behind the speaker inside the door and through the rubber boot. I just pushed on the wire till I managed to get it through. Don’t force it. If you’re stuck, start over. Once you have the wire through the rubber boot, you’ll then want to pull enough through to where you’ll be able to wire it under the inside trim and under the seat to the trunk/hatch area.

Image


Once you have enough wire through the rubber boot, you’ll want to un-clip the connector shown in the picture below and pull it a little inward. You will not be pulling the wire through this hole; this is just giving you more room to use the coat hanger down a slight gap to the hole below where we removed the rubber grommet earlier.

Image


Grab the hanger again and tape the end of the wire to it. Making sure it’s flat as possible. You’re going to start from the top and push it down through a small gap in the wall of the car. Keep pushing it till you can see the wire/hangar as shown in the pictures above.

Once you can see the wire, you can go from the inside of the car with the needle nose pliers to pull the wire through the hole directly behind the hole shown circled in the below picture. It’s a tight fit, but you can get to the small hole where the grommet was from the opening at the bottom where the seat belt is mounted as you can see through the car at this point with the grommet and inner trim removed. Pull the wire through. You will most likely damage the end of the wire doing this. That’s fine. Once it’s all pulled through, cut the end off past the point of damage.

Image


Now just run the wire along the same path that you did for the power and REM wire for both sides. You can see the routing for the speaker wire above and coming out the back below.

Image


You can push the rubber boot for the wires back into the door and pillar. Do this before snapping the wire harness connector back into place as it makes it easier to get the boot back in and sealed.

Snap the connector back into place where you ran the wire down through the door.

You can now install the inside pillar trim back in. Take care to snap it back into place properly. You’ll likely have to pull the back seat trim piece forward to fit the pillar trim back under it. Reinstall the grommet into the door.
 

Attachments

#11 ·
Hey is it possible to put some sound deadening behind the speaker, well behind meaning on the inside part of the door panel itself?

Is it easy to remove the whole black door shell that holds everything in place? Or would it be easier just to remove the speaker and put some back there though it might be tight with room?

Speaker Wire Install

First, you’ll want to remove the door panels. There’s a video on YouTube for how to do this. Just search for “how to remove door trim Hyundai Ioniq” and a video by Paul Romo (not me) should show up. The easiest way to do this is to first, remove the screw under the rubber piece sitting down in the arm rest. You will then start at the bottom of the door (there’s a gap to make it easier for removal there) and pop the door trim out working your way left and right. Once you have all the clips undone, you can lift upward.

You’ll need to remove two connections at this point to fully remove the door. The electrical connection for the window and the connection for the door handle itself. The electrical connection has one clip. Push that in and pull it out. The door connection also has one clip. You’ll lift that clip and then tilt it up/away from the door and it will unhook. This is all explained in detail with the video mentioned above.

Then, remove the four bolts holding the speaker in place as you’ll need to access behind it to run the wire from the door to inside the car.

Image


Next, you’ll need to remove the inner B-pillar trim of the car. If you have reinstalled the front seat bottom door trim, or did not remove it while running the power wire at the bottom of the driver’s side door, go ahead and remove it.

Then you’ll want to pull the weather stripping out a bit till you have cleared the dark lower trim on the B-Pillar. This may not be necessary, however I found it easier to remove the inner trim this way.

After that, you’ll want to pull the seat all the way forward as well as tilt the back support all the way forward.
Starting from the bottom to remove the B-pillar trim, pull directly away from the trim to remove it. To make this easier, you can push the seat belt connection at the bottom, flat. You can look under to see where some of the clips are so you don’t damage the trim by bending it. Once you’re near the top, the trim is clipped into the top lighter section on the sides. You can reach under and pull up on each side. It will un-clip. Then there’s one more clip that you’ll need to pull out, away from the pillar to release the trim. See the below picture for what the area looks like with the trim removed.

Once you have the trim removed, I’d recommend moving the seat belt out of the way as shown above. I just pulled it out all the way and then wrapped it around the seat and under the headrest. This will give you room once you get to pulling the wire through.

Next, you’ll want to remove the bottom rubber grommet shown in the picture below at the bottom of the exterior B-Pillar as well as pull back/undo the rubber boot from the door and car pillar. With this grommet removed and the inside trim of the B-pillar removed, you’ll be able to see through the small hole through the car. This is where you’ll eventually pull the speaker wire through.


**Note: If you plan on hooking up to your amp with a high level speaker input connection, you’ll only need to run a positive wire from the positive connection on your speaker to the rear area to connect to the amp. If you want to install a high to low converter you’ll need both the positive and negative speaker wires ran from the speaker to the amp.**

You’ll want to run the wire behind the speaker inside the door and through the rubber boot. I just pushed on the wire till I managed to get it through. Don’t force it. If you’re stuck, start over. Once you have the wire through the rubber boot, you’ll then want to pull enough through to where you’ll be able to wire it under the inside trim and under the seat to the trunk/hatch area.


Once you have enough wire through the rubber boot, you’ll want to un-clip the connector shown in the picture below and pull it a little inward. You will not be pulling the wire through this hole; this is just giving you more room to use the coat hanger down a slight gap to the hole below where we removed the rubber grommet earlier.


Grab the hanger again and tape the end of the wire to it. Making sure it’s flat as possible. You’re going to start from the top and push it down through a small gap in the wall of the car. Keep pushing it till you can see the wire/hangar as shown in the pictures above.

Once you can see the wire, you can go from the inside of the car with the needle nose pliers to pull the wire through the hole directly behind the hole shown circled in the below picture. It’s a tight fit, but you can get to the small hole where the grommet was from the opening at the bottom where the seat belt is mounted as you can see through the car at this point with the grommet and inner trim removed. Pull the wire through. You will most likely damage the end of the wire doing this. That’s fine. Once it’s all pulled through, cut the end off past the point of damage.


Now just run the wire along the same path that you did for the power and REM wire for both sides. You can see the routing for the speaker wire above and coming out the back below.


You can push the rubber boot for the wires back into the door and pillar. Do this before snapping the wire harness connector back into place as it makes it easier to get the boot back in and sealed.

Snap the connector back into place where you ran the wire down through the door.

You can now install the inside pillar trim back in. Take care to snap it back into place properly. You’ll likely have to pull the back seat trim piece forward to fit the pillar trim back under it. Reinstall the grommet into the door.
 
#5 ·
Once you have that done, run the wire back behind the speaker and through the grommet in the door as shown below. I just drilled a hole through the grommet and then pushed the wire through. I also had already re-installed the speaker by the time I took the photo below.

I’d recommend rolling the windows down for this part (You’ll need to hook the door trim plug back up to do this for each door.) to make sure you run the wires properly and they don’t interfere with the windows when they’re rolled down. Also, you'll want to have the wire held in place as I noticed a slight rattle when hitting bumps originally. Once you’re sure you have enough length you can cut the speaker wire you’ve ran though the door. Then strip the end of the speaker wire you installed so it will have a good connection when the quick connects are installed.

Image


Then, take the quick connects and hook the positive and negatives to the speaker wires as shown above. You'll have to pull back a little bit of the wrapping on the speaker wires.

Positive and negative wires for the speakers in the back doors are as follows…

Driver side:
Positive, Yellow.
Negative, Black.

Passenger Side:
Positive, Brown.
Negative, White.

To verify this, you can test it with a C/D battery by hooking up a wire to the positive and negative side of the battery and then touching the speaker. If the speaker pushes out you’ve got the positive and negative connections identified. If the speaker pushes inwards, you are backwards. There are a few YouTube videos on how to do this if you want to try it yourself. This guide is assuming all of the wires will be the same colors across different vehicles, but you shouldn't. I recommend you double checking.

Once you have the wire connected you can do the same test as mentioned above at the end of the wires in your trunk/hatch area to make sure you have a good connection to the speaker.

You can now reinstall the door trim. Make sure to hook up both the electrical connector and door handle connection before putting it back on or you’ll have to take it back off. Once all the clips are back into place reinstall the screw in the armrest and put the rubber cover back in.
 

Attachments

#6 ·
Amp Wire Connection Install

Your amp is now ready to be wired. For the amp I’m using, the connector can be removed which makes hooking up all the wires extremely easy.

The power wire will be hooked to the “B+” connection. The ground wire will hook up to the "G" connection. And finally the remote on REM wire will be installed to the "REM" connection. Take care not to have any short due to a cable strand sticking out and possibly touching one of the other wires. The amp is now wired.

Image
 

Attachments

#7 ·
Amp Speaker Input Wire Connection Install

For the amp I’m using, there are two different ways to install the speaking inputs. You can either do a high level wire install (This is directly taking the wires ran from the car speakers and running them to the amp inputs) or a low level install which involves buying a high to low converter box separately as well as an extra RCA male to male cable to run from that box to the amp. Both will work for the amp I’m installing, you just have to have the right setting pushed on this amp.

Not all amps can do both high and low inputs. Check your amp before installing to know what type of connection you’ll need.

For ease of install and to save money, I am installing as a high level input. For this I purchased the Rockford Fosgate RFI2SW Speaker Line to Male RCA Adapter. I also realize I took no pictures of this however if you follow the instructions for this on Rockford Fosgate's website you will be fine. Scan from the booklet I had is below. Note that it says the grounds go back to the source unit to be grounded there. You can ground to the frame and it will work just as well.

Image


For High Level Input to Amp using the RCA adapter:
Connect the Left Side Positive speaker wire to the White wire on the RCA adapter.
Connect the Right Side Positive speaker wire to the Grey wire on the RCA adapter.
Connect a separate speaker wire that will be hooked to a ground to the White/Black wire on the RCA adapter.
Connect a separate speaker wire that will be hooked to a ground to the Grey/Black wire on the RCA adapter.
Connect both of the negative speaker wires to a ground on the car. You can use the other bolt on the seat to do this next to where you hooked up the ground. (Further up near the beginning of this guide.)

(IF YOU RAN BOTH POSITIVE AND NEGATIVE SPEAKER WIRE FROM THE SPEAKERS, DO NOT HOOK UP THE NEGATIVE SPEAKER WIRE TO THE NEGATIVE RCA ADAPTER CONNECTION FOR A HIGH LEVEL AMP CONNECTION. YOU CAN/WILL CAUSE DAMAGE TO THE AMP AND/OR THE CAR STEREO SYSTEM.)
 

Attachments

#8 ·
Remote Bass Boost Install

For this optional remote connection you’ll need to start at the front of the passenger side of the car. Clean out your glove-box and remove the two grommets as shown. This will allow the glove-box to fall lower so you have access behind it.

Image


Image


Go from underneath the passenger side dash and push the wire up through the bottom till you can pull it into the glove-box area. I pulled enough through and then pushed it through the hole where the grommet was to hold it snug for the install.

Image


You’ll then want to run the wire back behind the kick panel, then under the trim, behind the seat belt to the back seat. You’ll then want to run it under the trim and the seat to pull it through to the trunk/hatch area the same way previous wires were ran and pulled through above.

Image


Image


You can then connect it to the amp. Reinstall the grommets in the glove-box and put everything else back in it. You’re done.

Image


That completes the wiring guide for the amplifier and speaker inputs on the USA spec Hyundai Ioniq Hybrid. I will not go into detail about how to wire the amp to the sub-woofers as there are different ways to wire them depending on your setup and if you want to wire them to 1Ω, 2Ω, or 4Ω as well as in parallel or in series. You should follow the directions provided with the equipment. depending on what type of subs and amp you have, they can/will be wired differently.

There may be some better ways to run some of the wires and there also may be a better way to hook into the speakers. I however did it the one way I found that worked.

Hopefully this guide can help a few other people who want a bass system in a car that is a bit different than a normal car. If you have any questions or need some clarifications please reply in this thread and I will try to get back with you. I know I'm a bit A.D.D. when it comes to these things so I may have not made something as clear as I needed.
 

Attachments

  • Like
Reactions: KevinT
#9 ·
Great write up and thanks for finding an efficient amp! Luckily my PHEV has a 12v in the trunk area saving my from having to go through the firewall. I'm curious, where did you windup placing your amp?
 
#10 ·
Thanks. I ended up mounting it directly on the box I built. Since the amp can be completely unplugged with two connections really quickly I opted for that so I could completely remove everything from my car in a couple of seconds.

My original plan was to design a fiberglass box that would directly install in the driver’s side hatch area and carpet that where the trim originally was so you wouldn’t even be able to tell it was there. But when I realized I could just remove the whole thing with that amp anyway, I went with the box.

That way I could remove the system entirely if I was going to need the room or have my car sitting at the airport for an extended amount of time.

I’ll get some pictures of the box and everything else tonight after work as I have to pull it out anyway.
 
#15 ·
Also, when un-clipped and pulled out this is what you see. This can easily be tucked under to the spare wheel area when not in use as long as you make sure to protect the 12V connection from touching metal and shorting.

I’m doing this from my phone, so sorry if the images are too small or messed up.

 
  • Like
Reactions: ScorpioH
#16 ·
Also, something I forgot to mention in my guide.

There is a slight buzz for about the first 3 seconds when you start the car and then it goes away. After I turned the gain down when tuning the amp it was completely unnoticeable.

I've noticed this in other vehicles before as well and it can be common. Some have a buzz and others will have a pop.

I had a 2012 Camaro 2SS that had the premium sound and I had to hook into the factory amp's pre-outs that had the popping sound. That one annoyed me to the point that I bought a trigger delay so it would turn the amp on a few seconds after the car started just to avoid the popping sound.

With this car I don't think it would be necessary though. And it's not going to hurt anything if you don't by a trigger delay.
 
#17 ·
Just a three+ month update. The setup is still going strong and I've ran into no issues with the battery, electrical system, or anything else with the way the amplifier system is currently set up. System is easy to remove when needed for extra room in the cargo area.

I did find that I needed to add some sound deadening material to the rear hatch to stop some vibrations where the plastic panels were hitting the metal body. Other than that, after tuning the amp a bit it sounds great. A little bit of base definitely changed the sound in the car since the basic model stereo system had none and was rather weak.
 
  • Like
Reactions: KevinT
#18 ·
Just a year+ update. I've had zero issues with this setup. No electrical oddities and the system still sounds good. I may be working on installing a second amp soon here for the main speakers to have a bit better overall sound.
 
  • Like
Reactions: KevinT
#20 ·
Absolutely. However, any modification can do this really.

Also it doesn’t “void” the warranty per say. What it would do is be cause for denial of repair with the warranty.
I’ve installed a lot of stereo equipment over the years and have never had an issue.

I do know that this is a bit different considering that it’s not a normal battery. However everything here is easily removable with exception of the door wiring. But they aren’t going to rip your door panels off to check for something.

Catch cans and intakes can do the same thing. I had a friend who’s Camaro blew the engine and they denied the warranty claim due to having a catch can. He fought it and lost. Got to be careful on every mod you do to any vehicle.

That’s why I say I’m not responsible for your vehicle however.

Every mod is “At your own risk.”
 
#21 ·
I learned the hard way and was denied the repair of my hybrid system $1900 from the check hybrid system light comeing on ,stuck on side of rd with no gas or electric system to use and the place we both got power source is clearly marked as a positive hot .(insignia on fuse box lid) .
 
#23 ·
I have noticed some however I rarely turn it up high enough to where it happens. It’s somewhere between 20-30 that it does have some roll off. I’ve never really played with it to figure out where.

If you have the extra money to throw in for an l2ci it wouldn’t hurt, however you may just want to hook it all up first and test it out and then see if it’s enough of a drop off to need one. I had ordered one originally but ended up cancelling the order.
 
#24 ·
Dude, THANK YOU FOR THE WRITEUP!

Seriously. It got me started down the rabbit hole.

Right now I am deciding whether to run a "to" wire going from each door to the amp in the hatch area (splice into factory speaker wire and send it to amp..and install the RCA input jack there) and a return wire back to each door with the amplified signal going directly to the speaker.

It's either that, or pull the head unit and splice into the wiring harness. I have quick connects where i can send the signal coming out of the head unit directly to the amp input jack (RCA connector spliced on), and then back to the head unit harness that leaves to the speakers.
 
#26 ·
Glad to hear it helped. I know there isn’t too many people who own one of these who would want to do this install but I decided to do the write up anyway because I couldn’t find anything on it. I did see a lot of people asking how to do it though.

That being said, when I did this write up I could not figure out how to remove the head unit to wire it from there so I just did it through the rear door. There’s probably more info out there now about it, or I just didn’t know where to look at the time. But how it’s wired for me currently is still working just fine.
 
#25 ·
I believe there's a small stock subwoofer in the Ioniq in the trunk (I own a limited 2020 hybrid, with infinity speakers).

If I understand right based on Crutchfield findings, there's:

  • one 2.5" mids center dash speaker
  • two 6.5" full range front door speakers (at least 2 1/8" depth)
  • two 6.5" full range rear door speakers (at least 2 1/16" depth)
  • one 8" woofer trunk speaker (at least 2 1/2" depth)

Anyone knows if that is indeed correct?

I am considering changing the speakers (not the head unit nor use an amplifier) to improve the already decent sound. My old car has Infinity Kappa Perfect speakers I could use as replacements.

Does anyone know the specs of the OEM speakers and if they match any Infinity store models?
Has anyone tried to replace the 8" woofer with an actual subwoofer, and know the specs?

I'm interested in good tight musical audio, not powerful SPL sound.
 
#30 ·
I would install speakers I already own, not Crutchfield. However mine are super deep and Crutchfield says they don't fit the doors (3 1/4" deep) but I would make a mount if there's a chance to cram it in.

For the sub, I only have a 10" so I'd want to take the back appart to see what fits... or maybe make my own enclosure with fiberglass D: to fit a decent sub.
 
#31 · (Edited)
So I went DEEP into this project.

I ordered 6 3/4 inch Rockford Fosgates for the front and rear that came with the separate tweeters. They sent me the speakers, but the adapters were on back order. I said screw that...i'm not waiting 2 months for these adapters to come in. I pulled the factory speaker holders, and took a sawzall to the back of them and gorilla glued in the speakers to the mounting plates. Worked perfectly. Made my own adapters to hold the tweeters in place by cutting a sheet of flexible plastic into strips and screwing them into the factory screw holes. I had also ordered a P-400 Rockford Fosgate Amp with wiring kit. I mounted the amp in the hatchback spare tire area.

I also ordered an Android head unit from China. It came with no instructions, but the wiring on the back of the unit is all labeled. It came with low level outputs, so i just ran RCA cables from the head unit to the 4 channel Rockford amp, and they sound awesome. I have another amp that I will order next week to connect the 12" Kicker sub in a box that I had ran an extra RCA cable for.

Now i'm at the part where I need to hook up the backup camera. Here is Crutchfield's blurb on the paperwork they sent me:

32216

Any idea where that reverse (+) wire is? This is the wire that is needed to show the head unit that the car is in reverse so it can automatically switch to the reverse camera. If we can find that, then i can proceed. I will take pictures of how to install the harness wiring into a RCA plug to plug into an aftermarket head unit. You also have to order a 12v to 6v down converter because for some reason the reverse camera is 6v. So that's another monkey wrench i'm figuring out.

If just one person can nail the install process a ton of people would be grateful i'm sure.
 
#38 ·
So I went DEEP into this project.

I ordered 6 3/4 inch Rockford Fosgates for the front and rear that came with the separate tweeters. They sent me the speakers, but the adapters were on back order. I said screw that...i'm not waiting 2 months for these adapters to come in. I pulled the factory speaker holders, and took a sawzall to the back of them and gorilla glued in the speakers to the mounting plates. Worked perfectly. Made my own adapters to hold the tweeters in place by cutting a sheet of flexible plastic into strips and screwing them into the factory screw holes. I had also ordered a P-400 Rockford Fosgate Amp with wiring kit. I mounted the amp in the hatchback spare tire area.

I also ordered an Android head unit from China. It came with no instructions, but the wiring on the back of the unit is all labeled. It came with low level outputs, so i just ran RCA cables from the head unit to the 4 channel Rockford amp, and they sound awesome. I have another amp that I will order next week to connect the 12" Kicker sub in a box that I had ran an extra RCA cable for.

Now i'm at the part where I need to hook up the backup camera. Here is Crutchfield's blurb on the paperwork they sent me:

View attachment 32216
Any idea where that reverse (+) wire is? This is the wire that is needed to show the head unit that the car is in reverse so it can automatically switch to the reverse camera. If we can find that, then i can proceed. I will take pictures of how to install the harness wiring into a RCA plug to plug into an aftermarket head unit. You also have to order a 12v to 6v down converter because for some reason the reverse camera is 6v. So that's another monkey wrench i'm figuring out.

If just one person can nail the install process a ton of people would be grateful i'm sure.
From what I’m seeing there should be a 48 wire harness somewhere down by your foot on the drivers side. Wire 3 would be the brown one on that 48 wire harness. I can’t go take my car apart currently or I would to see if I could find it.

If you can get that front kicker panel off and get a picture we might be able to decipher which wire it is possibly.

As for the converter for 12v to 6v you may be able to use a buck converter.
 
#43 · (Edited)
Ok, it's done. Reverse indicator wire is under the kick panel down by your left foot. Just pull towards you to remove the hood release latch. Push the E brake all the way to the front, and then pull the panel out. It pops right off. Tap off the 3rd pin wire (solid brown wire on the 48 pin molex connector with gray release) and run your wire under the dash to the head unit.

Image


Then for power, there is 12v + and ground on the B Connector. (Just use the Orange and Black wires at the top of the below pic for simplicity.) Tap into those and run your 12v to 6v down converter to your Camera Power (Pin 6) and Camera Ground (Pin 20) on the A Connector. I used this:


Image


I didn't even have to mess with anything else after that. No splicing of RCA jacks or anything because the head unit harness that came with it had the reverse camera already connected through the stock harness. If you have to mess with those, the pins are listed on the Wiring Harness sheet earlier in the post.

I used a wire coat hanger to fish everything through the dash.Came out pretty nice.
 

Attachments

#44 ·
Nice. So everything from your last post asking about if it was right worked out then? I honestly wasn’t sure what the answer was. This car has some oddities and way too many wires.

May need to post a video link to it all working and the final product. If I ever put in an aftermarket head unit I’ll go this route. Just wanted to keep the stock one in for now.

I definitely wouldn’t mind aftermarket speakers either.