Hyundai IONIQ Forum banner

EASY CLEAN DASHCAM WIRING - Adapter for Auto Dimming/Homelink mirror!

1 reading
44K views 69 replies 36 participants last post by  ZAnaMobile  
#1 ·
The Dongar adapter just arrived and I did a Facebook Live stream testing it and IT WORKS!
Here's a link to the live stream I did:
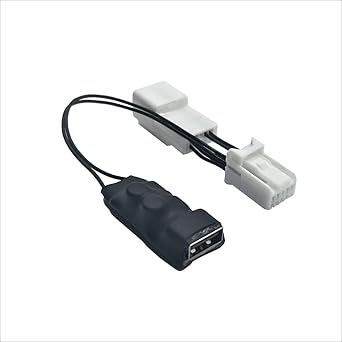
Super simple to install, it supports up to 5V 2A, my dashcam is 5V 1A.

You can buy from their website or on Amazon.

Image


The center piece of the sensor cover pops right off, just pull from the top corners.
The large plastic cover is easy too, after removing the center cover, push down on the large plastic piece.
Image

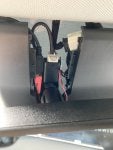
Plenty of room to store long cables.
Here's what the sensors on the windshield looks like.
Image


So I put the USB plug and most of the USB cable on the left side of the plastic cover, then squeezed the white adapter to the right side. Had to turn it a bit otherwise the center piece won't snap in all the way.
Image
 
#2 ·
thanks for the video, very informative and clean install.

Regarding the auto dimming mirror usually has a photosensor on the back of the mirror which faces towards the front windshield. By placing the dash cam where you have placed it, does it block the mirrors auto dimming front photosensor? If it does, wondering if it affects the auto dimming feature?
 
#5 ·
I plan on trying this. I ended up getting the Garmin Mini 2. Here’s the manual.


I would need to get a shorter right angle micro USB. Do you think this would work with the Garmin?

 
#13 ·
Looks like they only ship to the US. But this adapter looks very easy to DIY, if we know the type of connector it's very easy to just buy a male-female connector like that and add in an additional usb control board very similar to what they have now. It's literally worth a couple of bucks from China.
 
#15 ·
Can confirm this works great as advertised yes it's more expensive than rolling your own but it works and it's simple and it shipped fast from Amazon. When the car is on it provides power to the USB port.

It's nice to have such a clean looking installation without wires running everywhere without taking any noticeable time to actually set it up. I do plan on getting a different one at some point and probably mounting it underneath the mirror so it's cleaner like the original poster but for just simple plug and Play it's fantastic

Image

Image

Image

Image
 
#20 ·
Here’s what it looks like if you have just auto dimming. I’m not sure what the brown conductor does. Red is at the 12V battery voltage when the car is turned on. No permanently on conductor unfortunately. The wires look pretty light so I wouldn’t want to push much current through them.
Image
 
#29 ·
Thank you for the head's up on the adapter!

I just completed install of a new 4K, GPS enabled Dashcam with front and rear monitoring.

I'll clean it up a bit another day when I'm less busy but I love the results:

View attachment 40320
Just a heads up, this is how I have my dashcam in my ioniq PHEV that I moved over from my old Honda Insight. I've the dashcam for 4.5yrs now and now, the rear camera is having issues from having the cable pinched and flexed light that. I've found that now sometimes the camera crashed when the car turns on and I need to unplug the rear camera and it's fine and crashed when plugged back in. I think the cable is starting to get a faulty connection since this is intermittent now, but unplugging it always solves the issue. So I guess future potential problem for you.
 
#33 ·
Hi all, hope you'll indulge a slight tangent. When mounting a dash cam, you may find that the further the lens is from the glass/windshield, the more reflection you may pick up from the dash/interior. You can counteract this with a circular polarizing lens (CPL), which should be available for the Viofo and clones.
If your cam is shaped like a mini DSLR, you can also DIY a solution with a bit of resourcefulness, a universal CPL, and a step-up ring (I used these parts on a Vantrue N4 and was very happy). Regardless of which route you go, be sure to look into how to index it properly, as the CPL needs to be set at the correct angle to cancel the reflections, just like with a DSLR.
 
#34 ·
Just wanted to share a little troubleshooting I had to do this evening to get this adapter to work with my Garmin Dash Cam Mini 2. When powering the camera from the adapter, I was getting a solid green LED from the device, which the manual says indicates that the dash cam is plugged into a computer. The dash cam doesn't record or connect via bluetooth in this mode, so my partner and I were initially disappointed that this may have been a failure.

Turns out it was a quick fix. I just used a narrow piece of scotch tape to cover the inner two contacts inside of the USB-A end of the included cable, obstructing the data connection. This tricked the camera into thinking it was only connected to power, and everything started working as expected!

I'm guessing this data/no data check may be used on other dash cam models as well, so this may be worth trying if your setup doesn't immediately work. (If you have a micro USB cable that only delivers power, that would work too in this case, but wouldn't make you feel like MacGyver. 😎)
 
#35 · (Edited)
Just wanted to share my setup as Dongar adapter is never available.
Bought harness from here Hyundai/Kia Mirror T Harness - For Use With Dash Cams, Radar (Pinout 2), and $3 12V to USB buck converter. The quality of the harness connectors is amazing!
Image


Cut red and black wires in half, soldered and shrink wrapped the converter
Image


Opened the small cover behind the mirror and installed the harness. The thing I like about this harness is that it is long and you can eliminate strain by placing it in a horseshoe shape as shown in the next picture.

Image


I also replace the micro USB cable that came with the camera with a 1ft long one.
 

Attachments

#41 ·
I've ordered the dongle from enesterov's post (thanks again for the info!) and will plan to connect the red and black wires using crimped butt connectors to the red and black wires of a dash cam adapter I already have that's a mini USB on the other end. There's an inline box that does the 12 to 5 V conversion. Will be lots of wiring but I can shorten the length at least.

Enesterov's solution looks much nicer and factory made, but I don't know how to solder!